Tuesday, March 22, 2011

Where I Create

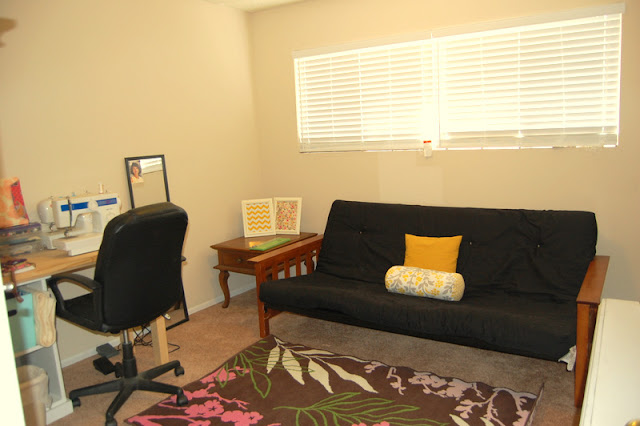
Ok people, this is my craft room.
I know I am one lucky lady to have my very own room where I can craft and sew to my heart's content. I've been saying since we moved in that I want to paint the walls (or maybe one accent wall?). I also need some more storage and window treatments.
This is what I'm working with right now.

Here is what you see when you walk in...

Looking to the South:


East:

I know my desk looks like a heaping pile of yuck. But seriously, this is very organized. For me.


North:

West:

The West wall is the most in need of TLC. I'm thinking about stringing up some twine and clothespins and making an inspiration line. I've seen that somwhere but i can't remember where.
I'd also like to paint all the wood white, just so that it looks more uniform, and any color that I add will stand out.
Let's just say that these are the "before" pictures, even though I don't have any immediate plans for the "after." I'm just doing a little bit at a time, and we'll get there when we get there.

Any suggestions for wall color? Window treatments? Storage? What to do with that black futon cover?


Monday, March 21, 2011

Dry Erase Fabric Frames

'Member these frames I got at the thrift store?
Put them together and see the new pretty frames for my craft room!


It was super simple... I just taped my favorite fabrics to the cardboard on the inside of the frame and boom! Instant color/liveliness in my blank-walled craft room!

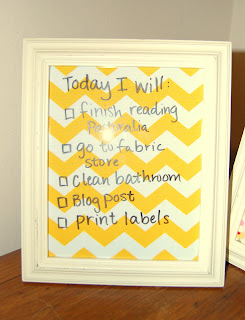
I'm using one as a checklist to keep me organized...


(psst! If you haven't read Pastoralia by George Saunders, I highly recommend it. I'm not finished yet but so far, it's absurdly hilarious)

... and the second one I'm using for funny/inspirational quotes. I asked my sister for a suggestion and it took her about half a second to blurt out this gem:


Tomorrow I will post about my entitre crafty space and you can see the bare walls for yourself!

Friday, March 11, 2011

Spring Luggage

Remember this duffle bag pattern that I bought awhile back?
I've made a little progress at a time, and she's finally done!!!

Just in time for spring break.
Actually my spring break isn't until next week, but we are going to Pismo Beach this weekend, and it's roomy enough for all my travel stuff. I also have a trip to Texas planned pretty soon and I can't wait to show off my duffle on the airplane!


So, I'm really happy with how the bag turned out. But I'm not gonna lie... it was really complicated. The pattern had great instructions, but it seemd like every step was a long and tedious process. I'd like to make these for my sisters (birthdays are coming up!), but it is going to take a lot of motivation. They are lucky I love them.

I've been doing a lot of yellow projects lately. I swear I make stuff in other colors too.

Have a nice weekend. I'll post Pismo pictures when I get home :)


Tuesday, March 8, 2011

Bolster Pillow Tutorial


Today I'm going to show you how to make a bolster pillow AKA lumbar pillow, AKA long roundish pillow.
This was pretty easy.The most difficult part was the math, but I've taken care of that for you.
So first, gather your materials. You'll need:
1 piece of fabric 18" x 25 5/8"
2 fabric circles 8" in diameter
1 bag of poly-fil (12 oz.)
sewing machine
scissors
iron

To make the circles, grab a bowl, dish or something round that has an 8" diameter. If you have a compass, that would work too. If you don't have an 8" bowl or a compass, you can try this technique by holding your thumb 4" from the point of the pencil, you will end up with an 8" circle.

I traced an 8" bowl and cut it out.


Take the large rectangle and fold it so that the shorter ends meet, right sides together.
Sew along the short end with a 1/4" seam.


Press the seam open


Center the seam and mark the other side of the fabric directly across from it.


Fold one circle in half and mark both ends.


Line up the marks on the circle with the marks on the rectangle, and pin in both places. Make sure the right sides are facing each other.
The top and bottom of the circle will be anchored, and now you can easily pin all the way around.


Repeat with the other circle.
Now sew around the edges of each circle with a 1/4" seam. Sewing curves is pretty tricky, but just go slow and guide the circle through the machine.

This is what you should have now:


After the circles are sewn, notch around the corners, being careful not to clip the stitches you just made.
I forgot to take pictures of this step, so I drew it for you in Paint.
The triangles indicate where to cut.


Now take your seam ripper, and open up the seam down the middle, making a gap just big enough for your hand to fit through.


 Turn the whole thing inside out through the hole you just made.


Start stuffing the pillow with the poly-fil. I used an entire 12 oz. bag. Work it around so it all feels evenly distributed.


Once the pillow is stuffed, sew up the gap with a whip stitch.


And now you're finished!


Optional: Add piping around the edges of the circles! I think I'll try that next time.

Now add your lovely new bolster pillow to your collection!


A note about the fabric: These are repurposed tablecloths and dinner napkins from the Dwell Studios collection for Target. They were on clearance!

I hope you enjoyed this DIY project. Let me know if you have any questions!
I'm linking to Blogger's Pillow Party!

Monday, March 7, 2011

A Very Yellow Weekend

Hi there! So, since you're here you've probably noticed my awesome blog makeover!
Isn't it glorious?
The blog was designed by Annie of the Wattlebird. She is one talented lady.
If you are looking for a new blog design, Annie is the one to contact. She was so easy to work with, and her designs are just so pretty.
Big HUGE thanks, Annie! I love this new look :)

So, everyone go snoop around Wattlebird blog and shop. I'm sure you'll find something amazing.


I have a fun little tutorial scheduled for tomorrow. So come back, ok?

Thursday, March 3, 2011

Thrifty Thursday

I would love to hit the thrift stores in my area more often. We have some awesome ones here that I just don't get to visit often enough. But I went today!
... and I scored big time.
Look what I got for less than $14
Two picture frames (8x10's) $1.99 each
...they are a little beat up. I'm thinking about painting them, but I actually kind of like the real look of distressed wood. Thank you thrift store pickers.


I also got this ADORABLE tunic, which I believe is originally from Old Navy. Only $2.99! I can't wait until the weekend, it's supposed to be 80 degrees on Saturday so I can wear it!

This is a cute little bag. It's pretty slouchy, but if I stuff it full of my junk, it looks like a bowling bag. My real intention is to take it apart and maybe salvage the straps and snaps, but I might use it a few times before that. It was $1.99

This clutch is for those times when I feel like gettin' glammed up, which I don't do very often. But for 99 cents, I just might have to find an occasion for sparkles in the near future.

Ok, now for this next one, I'm gonna have to ask that you fight the rage and refrain from choking me. YOU WILL ENVY THIS.
This was the best score of the day, the week, and possibly the pride of all my thrifting scores.
Ready?

Shazam!
This messenger bag caught my eye, and I almost walked away. I don't know what I was thinking. I did a double-take and then I went back and snooped around inside.

There are so many pockets, and it is big enough to hold all of my school stuff. It is just barely too small for my laptop. But I might just have to get a new laptop to go with my fantastic thrifted leather satchel that cost me $2.99

Ignore the mess. Focus on the awesomeness.

So here is my entire treasure trove of thrift store finds. Not a bad Thursday afternoon.

Grand total: $13.94

Tuesday, March 1, 2011

Hit Me Baby One More Time + A Spoiler

This weekend I went to Vegas. I go there A LOT. When I say a lot, I mean that I went there three times in February. I have a lot of family there, plus it seems to be the place where all the fun is. I went to see George Strait and Reba in concert earlier this month (actually I guess it was last month. Hello, March), and this past weekend I went to celebrate a friend's 21st birthday. She stayed at the Hard Rock hotel, which I have always loved. There is so much cool memorobilia to look at. Here is a picture of me next to Britney's actual Baby One More Time outfit.

I also saw Madonna's cone boob outfit, Michael Jackson's actual glove (it was too sparkly to be captured in a photo), and Kurt Cobain's moonman statue from MTV. That's just in the lobby. If the drinking and gambling hadn't pulled me in, who knows what treasures I could have found.

I dropped off my Feb. swap gift at the post office this morning. March always sneaks up on me every year. Sorry, Marisa, it will be there in a couple days. Now stop reading because the next part of this post includes photos of the gift you will be receiving. Unless of course you want to ruin the suprise, then I guess you can look.
Here are the aprons I made for myself and Marisa:
(SPOILER!!!)


I LOVED making these. I used a tutorial from Amy Karol's book Bend the Rules Sewing. I've made these as gifts before, but I never kept one for myself.
I bought the fabric from Target. It was meant to be a tablecloth, but a 60x80 piece of fabric with pre-hemmed edges is really not going to last long in my house without being cut up. Plus it was on clearance for $4. I still have plenty left, so I might make another apron or some tote bags.
Last night I got an early start on my March swap gift, so hopefully it will get there before April.
To see more info about the Great Create 2011 Craft Swap, check out My House is Vanilla.